The ultimate guide for your first steps with GridUp
.jpg)
To get started with GridUp for the first time, we recommend that you first log in to GridUp.io and get an overview.
Your account
Once you have logged into your account, you will automatically be directed to your dashboard. This is your starting point and your GridUp desk.
On the dashboard you have the most important selection options at your fingertips such as:
- The GridUp Component Library
- The Resource Library with knowledge material
- The GridUp Chrome Extension for quick download
- The GridUp Figma Library
Below you can see what's new from the community or from GridUp itself. This will keep you up to date with new features, updates or interesting articles you might have missed in your inbox.
Your first Webflow project with GridUp
If you are using GridUp for the first time in your project, we recommend you to start with a new project to get familiar with the functionality of GridUp.
1. Browse through the components library
- Get an overview of the components in our library, see which ones you like and mark them as a favorite.
- Familiarize yourself with the filters so that you can use them more quickly later in the application.
- Test a component by clicking on the copy button of a component in the Chrome Extension and copy it to your page with cmd + v or cltr + v. However, delete it again afterwards.
- Do the same with the pages and pick your favorites.
2. Make sure, the style sync is activated.
You find it in the tab Basics and can easily activate it there. For more information about the style sync, visit this article.
3. Start the Site Builder
- Go to the Basics tab and click on the Site Builder.
- Clicking on the Site Builder will open a new window with the Project Style Settings.
- Click on "Edit" in the "Add button" field, which will open the Button Editor. Now select your button sets by first selecting which button you want to assign in the panel on the left and then assigning a button set with "Add" in the selection on the right.
- Next, click on "Edit" in the field "Add Navbar", whereupon the Navbar Editor opens. Now select your navbar by clicking on the left side of the panel and then add a navbar with "Add" on the right side of the panel.
- Now, click on "Edit" in the field "Add Footer", whereupon the Footer Editor opens. Now select your footer by clicking on the left side of the panel and then add a footer with "Add" on the right side of the panel.
- Next, select the setup process. So that GridUp knows how to insert the classes, you have the choice between 3 setup variants:
- delete existing: deletes all existing classes and generates all classes.
- overwrite existing: if classes with the same names already exist, they will simply be overwritten with the new styles.
- skip equal: if classes with the same names already exist, they will be skipped and not changed.
- Start the Site Builder process by clicking the "Start Process" button. The page will be reloaded (do not interrupt this process). Now you will see a new page in your project called GridUp Style Guide. This style guide, which is based on Finsweet Client First 2.0, has been generated by GridUp for you. Here you can customize your classes.
- Now, customize the classes so they match the design of your next project.
4. Add a page structure to your home page
- Go to the tab "Basics" and click on "Add pages with structure".
- Click on "Add page structure" and a new screen will open.
- Select the pages to which you want to apply the page structure and click "Add Structure". GridUp will automatically add the page structure, navigation bar and footer.
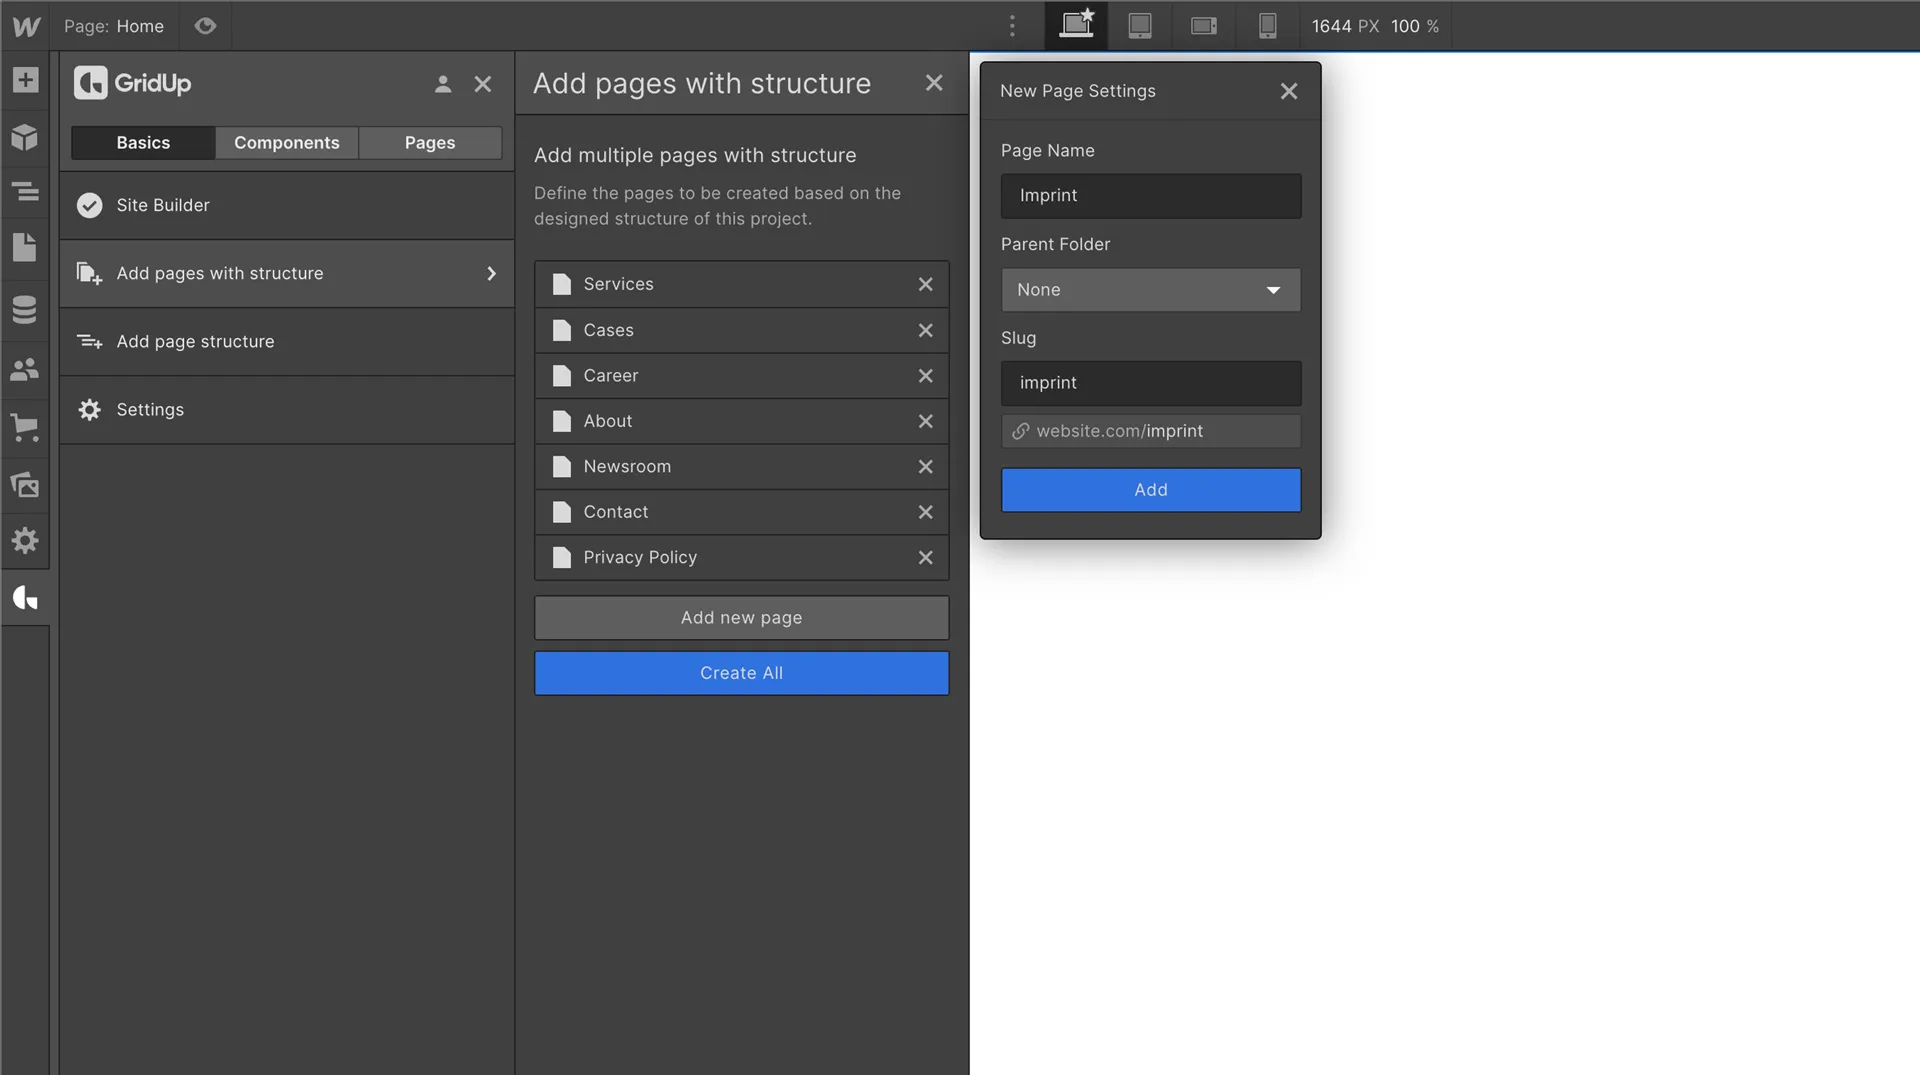
- Create multiple new pages with page structure
- Go to the tab "Basics" and click on "Add pages with structure".
- Click on "Add new page" and the New Page Settings will open.
- Enter the names for your new pages such as About us or Career, and adjust the automatically generated slug if necessary.
- Click on „Add“. Add as many pages as you want this way.
- Click on "Create All" and GridUp will automatically create the pages for you, add the page structure, navbar and footer.
5. Build your first complete page with components
- Go to your home page and add the following components:
- a header component
- a Logos component (components > section > logos)
- a content component with an image
- a FAQ component
- Note that the styles now automatically match the classes configured in the style guide and buttons are automatically replaced by the ones configured in the site builder process.
- Configure the components to your personal taste.
- Build a page with a page component
- Go to the second page you created and insert a page component from the tab Pages.
- Notice, that the navbar and footer have been previously added by the site builder so page components themselves never contain a navbar and footer.
Now you’re ready to go for your first real project! Please check out the GridUp resource library to find out more about how you can improve your processes with GridUp and get the most out of it.
Are you ready for more?
Thefuturehits Webflow.
Scale your work and grow your business with powerful automation in Webflow.


